width=
Showing posts with label Pinterest Project Saturdays. Show all posts

Saturday, January 14, 2012

Pinterest Project #5: Curling Your Hair: The Remix

Welcome to another installment of Pinterest Project Saturday!

When I last posted about curling your hair without heat, it wasn't a complete success. To be honest, both methods I tried left me a little disappointed to do all that work and have it be for nothing. Now, keep in mind as I said before, my hair is super thick. It does not hold curl well, even if I spray the crap out of it with hair spray and then curl it with a curling iron. It lasts for about 30 minutes if my hair is down, and maybe an hour or two if it is up. So, I went in search of one more way to try to curl my hair, and found this:


So, I gave it a try. I don't have a before photo but I followed the steps and ended up looking a little bit like this:


Not the character (which is Sikozu in Farscape by the way - Love her!) but how her hair is, is how mine looked before going to bed for the night. (OW. Those things are killer sleep-zappers! I had a horrible time sleeping.)

Here's how she looked in the show once the bantu knots came out:


And here's mine!


I was really happy with the curls when I took them down and got them finger-combed through. But as I was styling I started noticing they were already starting to fall. If you notice in the picture, the right side of my hair was already partly straight. It seems like this method is going to be good for waves and texture, but not much else.


And I was right, by eight o'clock, my hair looked like this.


Now, I will say that I fought with a few raindrops (it was sprinkling) but for the most part it should have held up. I might give this one more shot, and use gel when twisting the knots so that it will dry while knotted up. If it doesn't stay after that it wasn't meant to be, and I may end up getting my hair permed again.

I think it'll be a while before trying it again though, sleeping on those knots hurt!


What the best way that you've found to curl your hair?


Saturday, December 10, 2011

Pinterest Project Saturday #4: Earring Organizer

So, this post is probably going to be pretty short and sweet, since I didn't take any progress photos. But, here it goes anyway.

The other day I was getting really frustrated digging through all my dangle earrings trying to find the pair I wanted. Plus, I bought this big ol' jewelery box last Christmas, and there STILL is not enough room for everything. Enter Pinterest.

I was inspired by these two photos.


And I thought, "I can come up with something quick that I can use!"

So I used:

1 old picture frame that I had lying around that I wasn't using.
a few strands of ribbon that I had bought for Natalie's hairbow organizer that I didn't use
some hot glue

And this is what I got:


It is kinda small, as you can see my earrings are jam packed on there right now, but it will work until I can afford to buy a bigger frame. I actually really like it, but I am thinking about using burlap or some other woven fabric next time, kinda like this:


There you have it! My newest project =)

Saturday, November 5, 2011

Pinterest Project Saturday # 3: Grocery Bag Organizer

So for this project, it's going to be a quick one. I'm thinking about instead of waiting until Saturday to do these projects (HELLO procrastination!) I am going to try and complete them earlier in the week.

The pinterest pin I decided to do for this week comes from a blog called Tatertots and Jello. It was one of the first things I found when I joined the site and I thought it was a fantastic idea, rather than my Outback bag full of balled up plastic bags. Here is the tutorial - I'm going to adjust it a bit. Here is the inspiration photo from the website:


You need:

Empty wipe container


Grocery bags, any kind


Duct Tape - they have awesome patterned ones at Walmart!


And scissors (for the duct tape)

Here we go!

First flatten out your first and second bag


Fold in half


And lay the handles of the second bag on top of the bottom of the first bag like this:


Flip the handles of the first bag up and roll! Stop when you have a big enough roll to fit inside your canister. Mine was a large canister and I think I got about 30 bags or so in it. (I didn't count silly me, and I wasn't unrolling that thing and starting over!)

Stuff it into your canister and pull the first handles through the top.


And decorate!


Sorry about the crappy quality of the photos. All I have right now is my camera phone, and it's ok, but it's not a professional or even DECENT camera by any means.

There you have it! Another Pinterest Project complete! =)

Tuesday, November 1, 2011

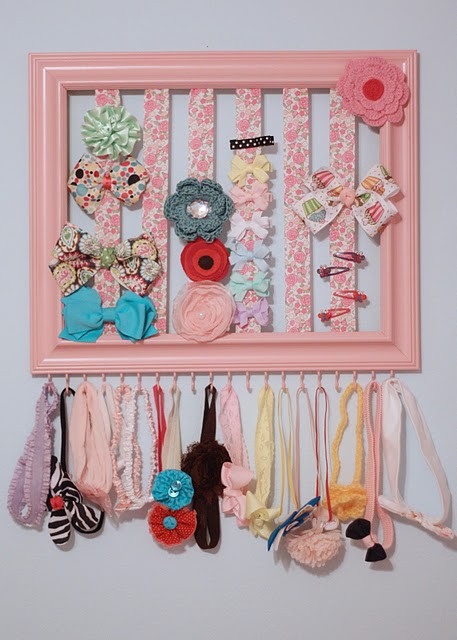
Pinterest Project Saturday #2: Hairbow Organizer/Pegboard

NOTE: After tomorrow I am going to move this back to Saturday where it SHOULD have been posted, but I didn't want anyone to miss this post, because I am so proud of it! =)

This pinterest project is something that I have been working for since before Natalie was born. I didn't know exactly what to do with this particular piece until I saw these inspiration photos on Pinterest.


I already had this:


Which I am going to do something like this to:

And combine it all together!

What you will need:

1 pegboard - any size
Paint if you want to paint the frame
Fabric to cover the pegboard (if you want)
Ribbon to make the diamonds on the pegboard and to hang from the bottom
Hooks to screw in to the bottom
a hot glue gun and glue
a hammer and nails (to hang it)
Hairbows and hairclips =)

I already had the frame painted. From there I cut the fabric to the right size and hot glued it to the corkboard and tucked the extra fabric under the frame. I then glued a ribbon down the center to hold extra hair clips and other things.


I hung two additional ribbons to the bottom for more hairclips and hooks on the inside for the headbands.


Done! Simple. Easy-peasy. Here it is on the wall - I'm thinking one side for a calendar, and the other for little things like appointment cards, birthday cards, mementos, little fun things, maybe a picture or two. We will see! I'm going to decorate it a little more this week. I'll post a new photo when it's finished!


There you have it! My first Pinterest Project! =)

Saturday, October 22, 2011

Pinterst Project Saturday #1: Curling your hair without heat

So, I tried this method two different ways. The first way was to use a headband and put it around your head and then wrap your hair section by section around the headband. You can find the tutorial here. The process looks like this:

Before:

During (side):


During (back):


During (front):


Unfortunately I don't have after pictures, but I will tell you that the curls were not bad when I left the headband in for a couple hours with completely dry hair - but they did not last all day. Nor did they last all day when I put hairspray in them and left them overnight. The curls themselves are not very natural looking and it was very hard for me to get the back to look good, because my hair is so thick. It may work on thinner hair, but this was not the way for me.

So, I went in search of another method. The sock bun curling method - you can find the video here.

Here is what the process looks like:

Before:


During:


The next morning:


After:


Better close up of the curls: (ignore my cheesy smile lol)


And pulled back in a ponytail for work:


This curling method I really think would work better if i had a smaller sock (aka tighter curls) because it made my hair flip out at the bottom and not much else. However, I also think this has alot to do with the fact that my hair is not that long. I really didn't have much to roll in there and I think if my hair was longer this would have turned out better. I will also say that it fell throughout the day so I recommend using some kind of holding agent. (hairspray or gel) I recommend this method between the two.

There you have it! The first Pinterest Project Saturday of many (I hope!)
Related Posts Plugin for WordPress, Blogger...